 Call Us:+86 186 5551 2307
 Mail Us:jhon@onaie.cn
 Call Us:+86 186 5551 2307
 Mail Us:jhon@onaie.cn
Penetrant testing, also known as liquid penetrant testing, is a non-destructive testing method widely used in industrial fields such as casting and forging. Its main function is to detect surface defects in mantle and concave, and other wear liners.
Its core principle is very simple and intuitive: it utilizes the capillary action of liquids to detect discontinuous defects with openings on the material surface, such as cracks, pores, and porosity.
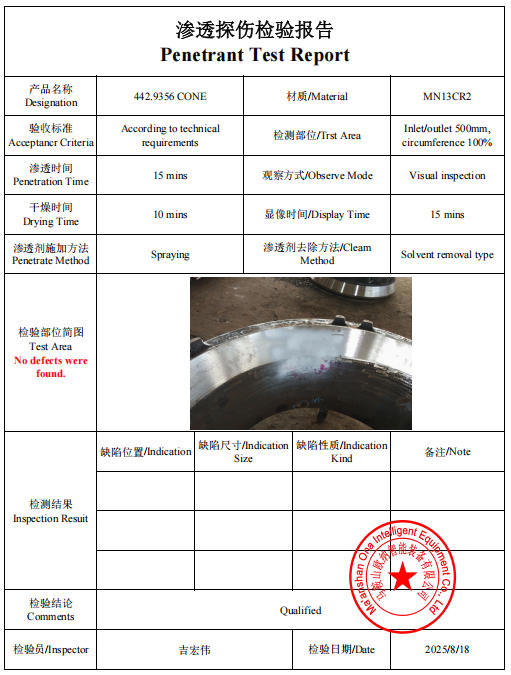
Here is a penetrant test report from ONA Casting, for CH660 cone crusher wear parts cone crusher concave liner 442.9356.

Basic Principles and Process
The penetrant testing process is similar to blotting away spilled liquid with a paper towel. The basic steps are as follows:
1. Cleaning: Thoroughly clean the surface of the bowl liner and mantle to be tested, removing any oil, iron filings, paint, etc., ensuring that defect pathways are open.
2. Applying the penetrant: Spray or brush a special liquid (penetrant) containing colored or fluorescent dye onto the working surface and allow sufficient "residence time" (usually a few minutes to tens of minutes). During this time, the penetrant will penetrate into even the smallest surface opening defects through capillary action.
3. Removing excess penetrant: After the residence time, carefully wipe or rinse off any excess penetrant from the working surface. The key point is that the penetrant trapped inside the defect will not be washed away.
4. Applying the developer: Apply a thin layer of developer to the working surface. It is usually a white powder suspension or dry powder, acting like blotting paper, using capillary action to "draw back" the penetrant from the defect to the surface.
5. Observation: After sufficient development time, observe the surface.
Staining method: Under sufficient white light, the defect will show a clear red (or other colored) mark.
Fluorescence method: Under ultraviolet light (black light), the defect will emit a bright yellow-green fluorescence.
Main advantages
High sensitivity: Capable of detecting extremely fine, invisible surface opening defects.
Wide application: Applicable to almost any non-porous material (metals, ceramics, plastics, etc.).
Simple operation: Relatively low equipment cost, simple and intuitive operation process.
Intuitive results: Detection results are directly displayed on the workpiece surface, easy to observe and interpret.
Portable: Can be used for on-site inspection of large equipment or components.
Our hours
Mon 11/21 - Wed 11/23: 9 AM - 8 PM
Thu 11/24: closed - Happy Thanksgiving!
Fri 11/25: 8 AM - 10 PM
Sat 11/26 - Sun 11/27: 10 AM - 9 PM
(all hours are Eastern Time)